<?php
  function getShortURL($longUrl) {
    $url = "http://udanax.org/shorturl.jsp?mode=api&longurl=";
    $url .= urlencode($longUrl);
    $data = file_get_contents($url);
    $json = json_decode($data, true);
    return "http://udanax.org/".$json['shorturl'];
  }

  echo getShortUrl("http://lyricsbird.net/lyrics.php?title=%EC%9E%A1%EC%9D%8C&id=672169");
?>
PHP로 Short URL API 사용하기
Short URL 서비스의 API를 이용하여 URL 줄이기는 AJAX/JQuery 를 사용하는 예제였는데, 아래와 같이 PHP로 간단하게 사용가능합니다. :)
Chrome Extension 개발하기 - Getting Started (Hello, World!)
1. Create a folder somewhere on your computer to contain your extension's code.
컴퓨터 어딘가에 extension code개발할 폴더를 하나 만듭니다.
2. Inside your extension's folder, create a text file called manifest.json, and put this in it:
JSON 포맷의 manifest 파일을 하나 생성합니다. 파일인코딩은 반드시 UTF-8 로 해야 한글이 안깨집니다. ㅋ
* 개발자들은 많이 봤겠지만 manifest는 양키들도 일상에서는 잘 안쓰는 말인데, 사전적의미로는 "명백한, 분명한, 일목요연한" 으로 나오나 한국의 뉘앙스로는 "택배에 배송지/연락처 등등이 잘 정리되어 붙은 스티커" 같은 의미정도 되는것 같네요.
내용은 모두 직관적이라 생략합니다.
3. Copy this icon to the same folder:
"default_icon": "icon.png" 부분에 선언된 바와 같이, extension 폴더 내에 icon.png 를 생성해서 넣어줍니다. 이 icon은 Chrome 에 출력될 버튼의 icon입니다.
4. Load the extension.
 > 확장 프로그램(E) > 압축 해제된 확장 프로그램 로드 ... 를 클릭해서 extension 폴더를 선택하면 Chrome 우측 상단에 extension이 설치된것을 볼 수 있습니다. 참 쉽죠잉~ :)
5. Add code to the extension.
아래와 같이 "popup": "popup.html" 을 추가하고, 폴더 내에 popup.html 파일을 생성하면 extension icon을 클릭했을 때, 팝업창으로 popup.html 이 뜹니다. iframe이나 javascript로 내용물을 구현하면 됩니다.
아래의 스크린샷은 위에 소개된 간단한 수준의 개발 지식으로 만든 extension입니다. popup.html 안에 query문을 form 전송하는 검색창을 넣은것이죠. (그러나 벌써 27 users 나 사용중이네요, 이것이 Global에 위력)

Reference: http://code.google.com/chrome/extensions/getstarted.html
컴퓨터 어딘가에 extension code개발할 폴더를 하나 만듭니다.
2. Inside your extension's folder, create a text file called manifest.json, and put this in it:
JSON 포맷의 manifest 파일을 하나 생성합니다. 파일인코딩은 반드시 UTF-8 로 해야 한글이 안깨집니다. ㅋ
* 개발자들은 많이 봤겠지만 manifest는 양키들도 일상에서는 잘 안쓰는 말인데, 사전적의미로는 "명백한, 분명한, 일목요연한" 으로 나오나 한국의 뉘앙스로는 "택배에 배송지/연락처 등등이 잘 정리되어 붙은 스티커" 같은 의미정도 되는것 같네요.
내용은 모두 직관적이라 생략합니다.
{
  "name": "Hello World Extension",
  "version": "1.0",
  "description": "The first extension that I made.",
  "browser_action": {
    "default_icon": "icon.png",
  },
  "permissions": [
    "http://api.flickr.com/"
  ]
}
3. Copy this icon to the same folder:
"default_icon": "icon.png" 부분에 선언된 바와 같이, extension 폴더 내에 icon.png 를 생성해서 넣어줍니다. 이 icon은 Chrome 에 출력될 버튼의 icon입니다.
4. Load the extension.
> 확장 프로그램(E) > 압축 해제된 확장 프로그램 로드 ... 를 클릭해서 extension 폴더를 선택하면 Chrome 우측 상단에 extension이 설치된것을 볼 수 있습니다. 참 쉽죠잉~ :) 5. Add code to the extension.
아래와 같이 "popup": "popup.html" 을 추가하고, 폴더 내에 popup.html 파일을 생성하면 extension icon을 클릭했을 때, 팝업창으로 popup.html 이 뜹니다. iframe이나 javascript로 내용물을 구현하면 됩니다.
"browser_action": {
    "default_icon": "icon.png",
    "popup": "popup.html"
  },
아래의 스크린샷은 위에 소개된 간단한 수준의 개발 지식으로 만든 extension입니다. popup.html 안에 query문을 form 전송하는 검색창을 넣은것이죠. (그러나 벌써 27 users 나 사용중이네요, 이것이 Global에 위력)
Reference: http://code.google.com/chrome/extensions/getstarted.html
PageRank Implementation Using the BSP
In this post, I'm showing how to implement the PageRank using BSP.
P.S. Apache Hama's BSP framework is not ready yet.
And P.S. again, The pseudo code is developed, based on Java multi-threaded programming. As I introduced before (Hama BSP), the BSP programming is very similar to multi-threaded programming (See BSP serialize printing example). So, the BSP brings a familiar programming model to developers for implementing distributed applications. :-)
Anyway, let's assume that the web-graph G is stored in row sparse format as below:
The PageRank Algorithm is as below:
1) If vi links to vk…
2) If vi has no outlinks…
3) Weighted moves from each page
Then, the algorithm can be implemented as below:
BSP main program:
Parallel part:
References : MultiThreaded Graph Library (MTGL)
P.S. Apache Hama's BSP framework is not ready yet.
And P.S. again, The pseudo code is developed, based on Java multi-threaded programming. As I introduced before (Hama BSP), the BSP programming is very similar to multi-threaded programming (See BSP serialize printing example). So, the BSP brings a familiar programming model to developers for implementing distributed applications. :-)
Anyway, let's assume that the web-graph G is stored in row sparse format as below:
Vertex: 1 2 3 4 5 6 Index: 0 1 3 4 6 8 10 IncomingEdgeList: 3 1 3 1 5 6 3 4 4 5 – Vertices V are web pages. – Vertex index[] points to list of incoming edges's vertex. | 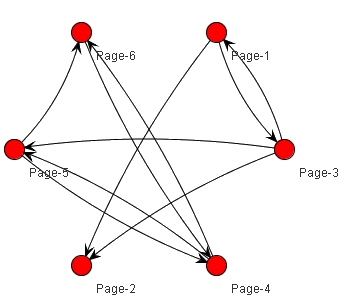 |
1) If vi links to vk…
– User equally likely to follow any link on page.
– Probability of moving from vi to vk = 1/out_degree(vi).
2) If vi has no outlinks…
– User equally likely to jump to any state.
– Probability = 1 / |V|
3) Weighted moves from each page
– Percentage of moves that follow a link == α.
– Percentage of moves that are jumps to another page == (1- α).
Then, the algorithm can be implemented as below:
BSP main program:
BSPPageRank pagerank[] = new BSPPageRank[vertices.length];
    // Loop over all vertices
    for (i = 0; i < vertices.length; i++) {
      pagerank[i] = new BSPPageRank(i);
    }

    for (i = 0; i < vertices.length; i++) {
      pagerank[i].join();
    }
Parallel part:
public void run() {
    double total = 0.0;
    int begin = index[ind];
    int end = index[ind + 1];
    //System.out.println("incoming edges: " + begin +" ~ "+ end);

    // Loop over edges pointing to vertex i.
    for (int j = begin; j < end; j++) {
      int src = j;
      double r = rank[src];
      double incr = r / (double) degree[src];
      total += incr;
    }
    accumulate_rank[ind] = total;

    // Call sync() method at here, if this is run on the BSP cluster
  }
References : MultiThreaded Graph Library (MTGL)
VirtualBox Kernel Errors on Ubuntu
솔직히 은행일만 아니면 깔고싶지 않은 것들인데.. 어쨌거나 설치하면서 만난 에러:
이럴때 그냥 심플하게 :
root@edward-desktop:/home/edward# sudo /etc/init.d/vboxdrv setup
WARNING: All config files need .conf: /etc/modprobe.d/bttv.modprobe, it will be ignored in a future release.
 * Stopping VirtualBox kernel module                                                                                                *  done.
 * Recompiling VirtualBox kernel module
 * Look at /var/log/vbox-install.log to find out what went wrong
root@edward-desktop:/home/edward# cat /var/log/vbox-install.log
Attempting to install using DKMS
  removing old DKMS module vboxdrv version  3.1.6

------------------------------
Deleting module version: 3.1.6
completely from the DKMS tree.
------------------------------
Done.

Creating symlink /var/lib/dkms/vboxdrv/3.1.6/source ->
                 /usr/src/vboxdrv-3.1.6

DKMS: add Completed.

Error! Your kernel source for kernel 2.6.31-21-server cannot be found at
/lib/modules/2.6.31-21-server/build or /lib/modules/2.6.31-21-server/source.
You can use the --kernelsourcedir option to tell DKMS where it's located.
Failed to install using DKMS, attempting to install without
Makefile:152: *** Error: unable to find the sources of your current Linux kernel. Specify KERN_DIR= and run Make again.
이럴때 그냥 심플하게 :
# apt-get install linux-headers-`uname -r`
# /etc/init.d/vboxdrv setup
How to Install VirtualBox Guest Additions in Fedora 12
First, in the VM menu (not the Guest but the chrome around it) go to Devices > Install Guest Additions. It will mount a new disc image. Then fire up terminal.
This time the kernel modules should compile. Then restart the system.
Update for 32-bit Guests:
A few possible changes if this doesn’t work for you with a 32-bit guest. (It didn’t for me, so I had to play around/research a bit more.)
Run
If so, make sure your kernel is up to date with
Instead of the kernel-devel package, you’ll need to install kernel-PAE-devel. That makes the second line of the example above:
Then, everything else should be the same.
$ su
# yum install kernel-headers kernel-devel gcc
# export KERN_DIR=/usr/src/kernels/2.6.31.9-174.fc12.x86_64
# cd /media/VBOXADDITIONS_3.1.2_56127
# ./VBoxLinuxAdditions-amd64.run
This time the kernel modules should compile. Then restart the system.
Update for 32-bit Guests:
A few possible changes if this doesn’t work for you with a 32-bit guest. (It didn’t for me, so I had to play around/research a bit more.)
Run
# uname -rIf you see the letters PAE, then you’ll need to follow the rest of these steps. If you don’t see PAE, you should be fine.
If so, make sure your kernel is up to date with
# yum update kernel-PAE. After this, restart.
Instead of the kernel-devel package, you’ll need to install kernel-PAE-devel. That makes the second line of the example above:
# yum install kernel-headers kernel-PAE-devel gccIf you’d already installed the kernel-devel package, you may want to remove it:
# yum remove kernel-develas it can confuse things.
Then, everything else should be the same.
The error message "An unknown error occured" of WordPress MU
It sometimes occur when the folder permissions or group ownership is not allowing the files to transfer over. However, In my case, php configuration was reason. The allow_url_fopen should be ON in PHP configuration (php.ini).
How to enable PHP JSON on Gentoo server?
URL shortener API를 php에서 사용해보려고 하다가 만난 삽질들인데...
CentOS 에서는
Plus, file_get_contents() 함수에서 에러나면,
Solution:
allow_url_fopen should be ON in PHP configuration (php.ini). Probably, you don’t have access to edit this file and it could also be that your hosting company has restricted changing the allow_url_fopen value. In this case, you should refer to them and ask them to set the value of allow_url_fopen to ON.
P.S. 프로그래밍 언어 중 내가 제일 싫어하는 것들: c, c++, php, shell script
CentOS 에서는
pecl install JSON해주면 되지만, gentoo에서는 뭔가 에러가 잔뜩 나온다. 이때,
USE="json exif" emerge dev-lang/php명령어로 설치해주면 되더군.
<?php
$url = "http://udanax.org/shorturl.jsp?mode=api&longurl=".urlencode("http://lyrics.udanax.org/lyrics.php?title=%EB%84%88+%EC%95%84%EB%8B%88%EB%A9%B4+%EC%95%88%EB%8F%BC&id=672028");
echo $url;
$response = str_replace(");","", str_replace("null(","",file_get_contents($url)));
$json = json_decode($response, true);
echo $json['shorturl'];
?>
Plus, file_get_contents() 함수에서 에러나면,
Solution:
allow_url_fopen should be ON in PHP configuration (php.ini). Probably, you don’t have access to edit this file and it could also be that your hosting company has restricted changing the allow_url_fopen value. In this case, you should refer to them and ask them to set the value of allow_url_fopen to ON.
P.S. 프로그래밍 언어 중 내가 제일 싫어하는 것들: c, c++, php, shell script
Subscribe to:
Posts (Atom)
-
 Opening the black box of Deep Neural Networks via Information - https://arxiv.org/pdf/1703.00810.pdf 지금까지 딥 러닝은 어떻게 동작하는지 이해할 수 없다고 믿어져왔다...
 -
음성 인공지능 분야에서 스타트업이 생각해볼 수 있는 전략은 아마 다음과 같이 3가지 정도가 있을 것이다: 독자적 Vertical 음성 인공지능 Application 구축 기 음성 플랫폼을 활용한 B2B2C 형태의 비지니스 구축 기 음성 플랫폼...
-
개발자 컨퍼런스같은 것도 방문한게 언제인지 까마득합니다. 코로나로 왠지 교류가 많이 없어졌습니다. 패스트캠퍼스로부터 좋은 기회를 얻어 강연을 하나 오픈하였습니다. 제가 강연에서 주로 다룰 내용은, 인터넷 역사 이래 발전해온 서버 사이드 기술들에 대해 ...